
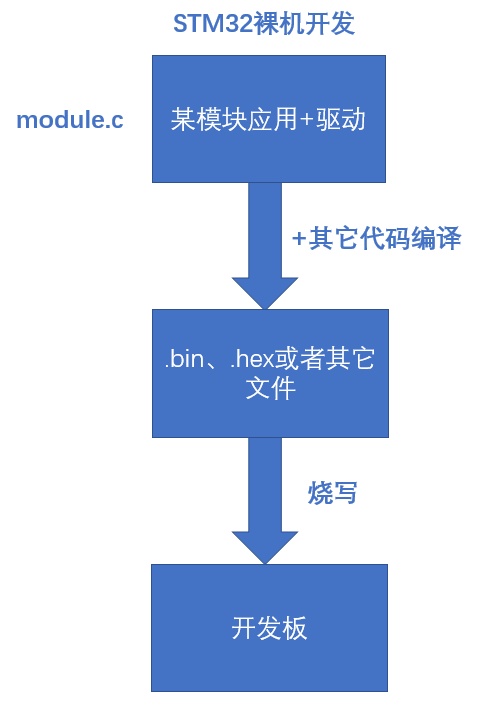
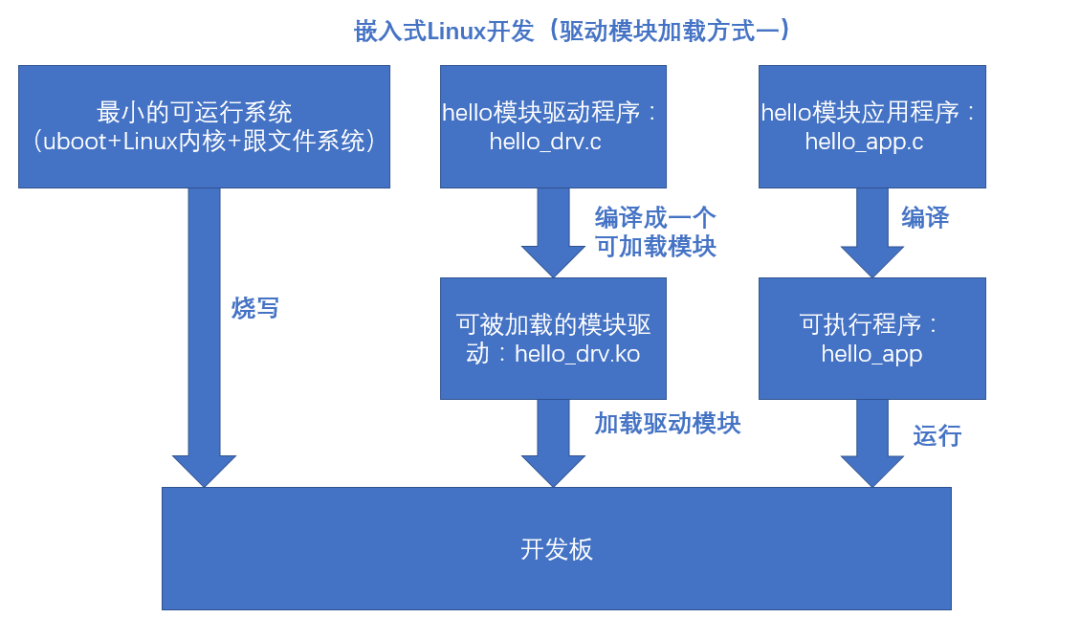
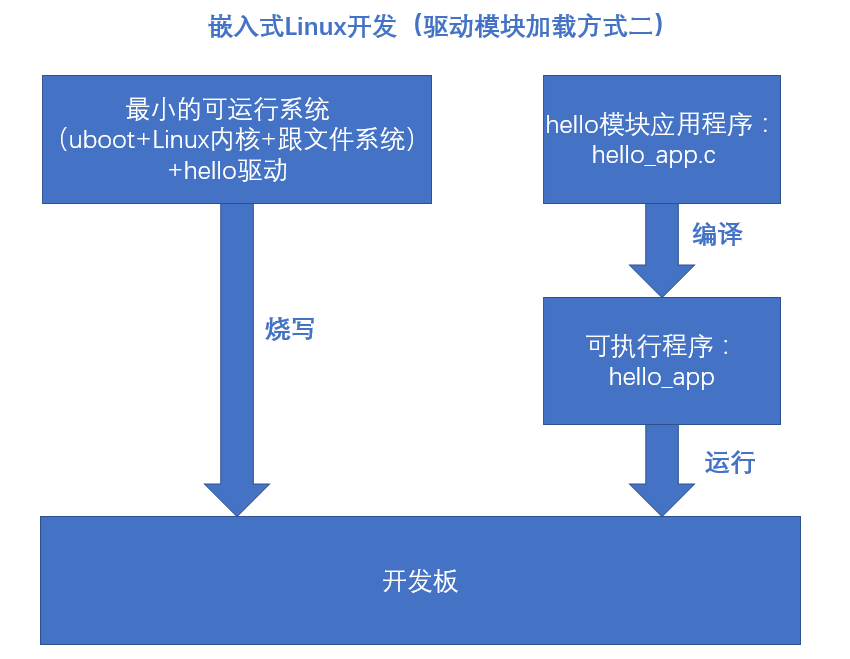
嵌入式Linux的開發方式與STM32裸機開發的方式有點不一樣。在STM32的裸機開發中,驅動層與應用層的區分可能沒有那么明顯,常常都雜揉在一起。
當然,有些很有水平的裸機程序分層分得還是很明顯的。但是,在嵌入式Linux中,驅動和應用的分層是特別明顯的,最直觀的感受就是驅動程序是一個.c文件里,應用程序是另一個.c文件。
比如我們這個hello驅動實驗中,我們的驅動程序為hello_drv.c、應用程序為hello_app.c。
驅動模塊的加載有兩種方式:第一種方式是動態加載的方式,即驅動程序與內核分開編譯,在內核運行的過程中加載;第二種方式是靜態加載的方式,即驅動程序與內核一同編譯,在內核啟動過程中加載驅動。
在調試驅動階段常常選用第一種方式,因為較為方便;在調試完成之后才采用第二種方式與內核一同編譯。
STM32裸機開發與嵌入式Linux開發還有一點不同的就是:STM32裸機開發最終要燒到板子的常常只有一個文件(除開含有IAP程序的情況或者其它情況),嵌入式Linux就需要分開編譯、燒寫。
我們先看一張圖:
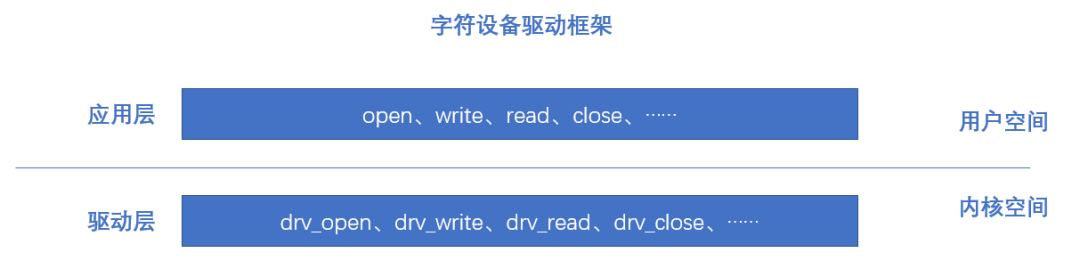
當我們的應用在調用open、close、write、read等函數時,為什么就能操控硬件設備。那是因為有驅動層在支撐著與硬件相關的操作,應用程序在調用打開、關閉、讀、寫等操作會觸發相應的驅動層函數。
本篇筆記我們以hello驅動做分享,hello驅動屬于字符設備。實現的驅動函數大概是怎么樣的是有套路可尋的,這個套路在內核文件include/linux/fs.h中,這個文件中有如下結構體:
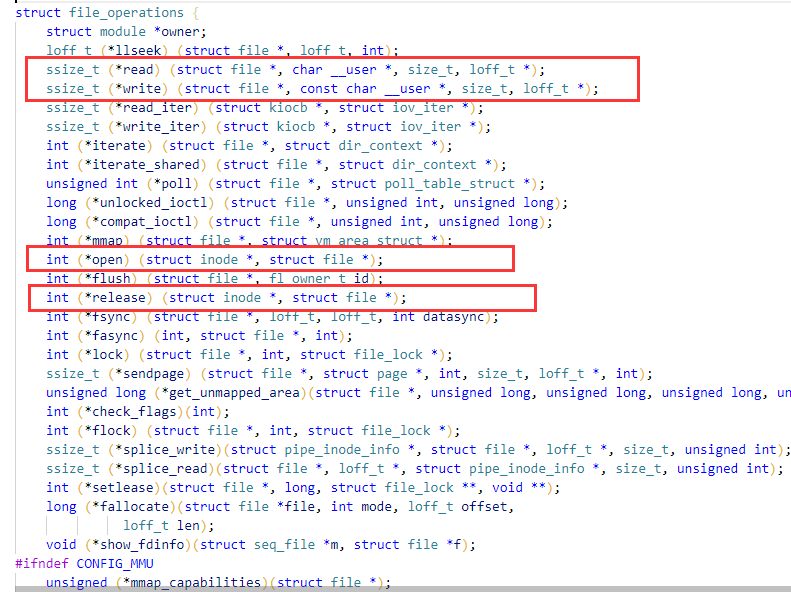
這個結構體里的成員都是些函數指針變量,我們需要根據實際的設備確定我們需要創建哪些驅動函數實體。比如我們的hello驅動的幾個基本的函數(打開/關閉/讀/寫)可創建為(以下代碼來自:百問網):
(1)打開操作
左右滑動查看全部代碼>>>
static int hello_drv_open (struct inode *node, struct file *file)
{
  printk("%s %s line %d\n", __FILE__, __FUNCTION__, __LINE__);
  return 0;
}
打開函數的兩個形參的類型要與struct file_operations結構體里open成員的形參類型一致,里面有一句打印語句,方便直觀地看到驅動的運行過程。
(2)關閉操作
左右滑動查看全部代碼>>>
static int hello_drv_close (struct inode *node, struct file *file)
{
  printk("%s %s line %d\n", __FILE__, __FUNCTION__, __LINE__);
  return 0;
}
(3)讀操作
左右滑動查看全部代碼>>>
static ssize_t hello_drv_read (struct file *file, char __user *buf, size_t size, loff_t *offset)
{
  int err;
  printk("%s %s line %d\n", __FILE__, __FUNCTION__, __LINE__);
  err = copy_to_user(buf, kernel_buf, MIN(1024, size));
  return MIN(1024, size);
}
copy_to_user函數的原型為:
左右滑動查看全部代碼>>>
static inline int copy_to_user(void __user *to, const void *from, unsigned long n);
用該函數來讀取內核空間(kernel_buf)的數據給到用戶空間(buf)。另外,kernel_buf的定義如下:
static char kernel_buf[1024];
MIN為宏:
#define MIN(a, b) (a < b ? a : b)
把MIN(1024, size)作為copy_to_user的實參意在對拷貝的數據長度做限制(不能超出kernel_buf的大小)。
(4)寫操作
左右滑動查看全部代碼>>>
static ssize_t hello_drv_write (struct file *file, const char __user *buf, size_t size, loff_t *offset)
{
  int err;
  printk("%s %s line %d\n", __FILE__, __FUNCTION__, __LINE__);
  err = copy_from_user(kernel_buf, buf, MIN(1024, size));
  return MIN(1024, size);
}
copy_from_user函數的原型為:
左右滑動查看全部代碼>>>
static inline int copy_from_user(void *to,const void __user volatile *from,unsigned long n)
用該函數來將用戶空間(buf)的數據傳送到內核空間(kernel_buf)。
有了這些驅動函數,就可以給到一個struct file_operations類型的結構體變量hello_drv,如:
static struct file_operations hello_drv =
{
    .owner   = THIS_MODULE,
    .open    = hello_drv_open,
    .read    = hello_drv_read,
    .write   = hello_drv_write,
    .release = hello_drv_close,
};
有些朋友可能沒見過這種結構體初始化的形式(結構體成員前面加個.號),這是C99及C11標準提出的指定初始化器。
上面這個結構體變量hello_drv容納了我們hello設備的驅動接口,最終我們要把這個hello_drv注冊給Linux內核。
套路就是這樣的:把驅動程序注冊給內核,之后我們的應用程序就可以使用open/close/write/read等函數來操控我們的設備,Linux內核在這里起到一個中間人的作用,把兩頭的驅動與應用協調得很好。
我們前面說了驅動的裝載方式之一的動態裝載:把驅動程序編譯成模塊,再動態裝載。
動態裝載的體現就是開發板已經啟動運行了Linux內核,我們通過開發板串口終端使用命令來裝載驅動。裝載驅動有兩個命令,比如裝載我們的hello驅動:
其中modprobe命令不僅能裝載當前驅動,而且還會同時裝載與當前驅動相關的依賴驅動。有了轉載就有卸載,也有兩種方式:
其中modprobe命令不僅卸載當前驅動,也會同時卸載依賴驅動。
我們在串口終端調用裝載與卸載驅動的命令,怎么就會執行裝載與卸載操作。對應到驅動程序里我們有如下兩個函數:
module_init(hello_init); //注冊模塊加載函數
module_exit(hello_exit); //注冊模塊卸載函數
這里加載與注冊有用到hello_init、hello_exit函數,我們前面說的把hello_drv驅動注冊到內核就是在hello_init函數里做,如:
左右滑動查看全部代碼>>>
static int __init hello_init(void)
{
  int err;

  printk("%s %s line %d\n", __FILE__, __FUNCTION__, __LINE__);
    /* 注冊hello驅動 */
  major = register_chrdev(0, 	/* 主設備號,為0則系統自動分配 */
                    "hello", 	/* 設備名稱 */
                    &hello_drv); /* 驅動程序 */

  /* 下面操作是為了在/dev目錄中生成一個hello設備節點 */
    /* 創建一個類 */
  hello_class = class_create(THIS_MODULE, "hello_class");
  err = PTR_ERR(hello_class);
  if (IS_ERR(hello_class)) {
    printk("%s %s line %d\n", __FILE__, __FUNCTION__, __LINE__);
    unregister_chrdev(major, "hello");
    return -1;
  }

    /* 創建設備,該設備創建在hello_class類下面 */
  device_create(hello_class, NULL, MKDEV(major, 0), NULL, "hello"); /* /dev/hello */

	return 0;
}
這里這個驅動程序入口函數hello_init中注冊完驅動程序之后,同時通過下面連個創建操作來創建設備節點,即在/dev目錄下生成設備文件。
據我了解,在之前版本的Linux內核中,設備節點需要手動創建,即通過創建節點命令mknod 在/dev目錄下自己手動創建設備文件。既然已經有新的方式創建節點了,這里就不摳之前的內容了。
以上就是分享關于驅動一些內容,通過以上分析,我們知道,其是有套路(就是常說的驅動框架)可尋的,比如:
#include
#include
#include
/* 其她頭文件...... */

/* 一些驅動函數 */
static ssize_t xxx_read (struct file *file, char __user *buf, size_t size, loff_t *offset)
{

}

static ssize_t xxx_write (struct file *file, const char __user *buf, size_t size, loff_t *offset)
{

}

static int xxx_open (struct inode *node, struct file *file)
{

}

static int xxx_close (struct inode *node, struct file *file)
{

}
/* 其它驅動函數...... */

/* 定義自己的驅動結構體 */
static struct file_operations xxx_drv = {
  .owner	 = THIS_MODULE,
  .open    = xxx_open,
  .read    = xxx_read,
  .write   = xxx_write,
  .release = xxx_close,
  /* 其它程序......... */
};

/* 驅動入口函數 */
static int __init xxx_init(void)
{

}

/* 驅動出口函數 */
static void __exit hello_exit(void)
{

}

/* 模塊注冊與卸載函數 */
module_init(xxx_init);
module_exit(xxx_exit);

/* 模塊許可證(必選項) */
MODULE_LICENSE("GPL");
按照這樣的套路來開發驅動程序的,有套路可尋那就比較好學習了,至少不會想著怎么起函數名而煩惱,哈哈,按套路來就好。
關于驅動的知識,這篇筆記中還可以展開很多內容,限于篇幅就不展開了。我們之后再進行學習、分享。
下面看一下測試程序/應用程序(hello_drv_test.c中的內容,以下代碼來自:百問網):
左右滑動查看全部代碼>>>
#include
#include
#include
#include
#include
#include
/*
* ./hello_drv_test -w abc
* ./hello_drv_test -r
*/
int main(int argc, char **argv)
{
int fd;
char buf[1024];
int len;
/* 1. 判斷參數 */
if (argc < 2)
{
printf("Usage: %s -w \n" , argv[0]);
printf(" %s -r\n", argv[0]);
return -1;
}
/* 2. 打開文件 */
fd = open("/dev/hello", O_RDWR);
if (fd == -1)
{
printf("can not open file /dev/hello\n");
return -1;
}
/* 3. 寫文件或讀文件 */
if ((0 == strcmp(argv[1], "-w")) && (argc == 3))
{
len = strlen(argv[2]) + 1;
len = len < 1024 ? len : 1024;
write(fd, argv[2], len);
}
else
{
len = read(fd, buf, 1024);
buf[1023] = '\0';
printf("APP read : %s\n", buf);
}
close(fd);
return 0;
}
就是一些讀寫操作,跟我們學習文件操作是一樣的。學單片機的有些朋友可能不太熟悉main函數的這種寫法:
int main(int argc, char **argv)
main函數在C中有好幾種寫法(可查看往期筆記:main()函數有哪幾種形式?),在Linux中常用這種寫法。
argc與argv這兩個值可以從終端(命令行)輸入,因此這兩個參數也被稱為命令行參數。argc為命令行參數的個數,argv為字符串命令行參數的首地址。
最后,我們把編譯生成的驅動模塊hello_drv.ko與應用程序hello_drv_test放到共享目錄錄nfs_share中,同時在開發板終端掛載共享目錄:
mount -t nfs -o nolock,vers=4 192.168.1.104:/home/book/nfs_share /mnt
關于NFS網絡文件系統的使用可查看往期筆記。
然后我們通過insmod 命令裝載驅動,但是出現了如下錯誤:
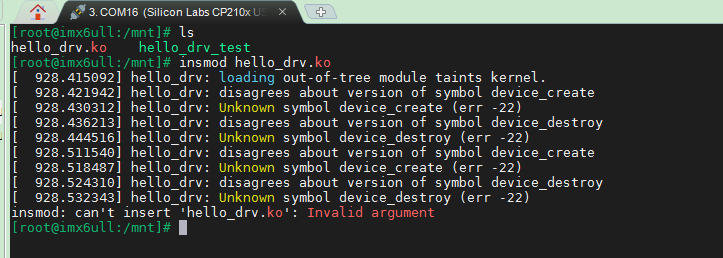
這是因為我們的驅動的編譯依賴與內核版本,編譯用的內核版本與當前開發板運行的內核的版本不一致所以會產生該錯誤。
重新編譯內核,并把編譯生成的Linux內核zImage映像文件與設備樹文件*.dts文件拷貝到開發板根文件系統的/boot目錄下,然后進行同步操作:
#mount -t nfs -o nolock,vers=4 192.168.1.114:/home/book/nfs_share /mnt
#cp /mnt/zImage /boot
#cp /mnt/.dtb /boot
#sync
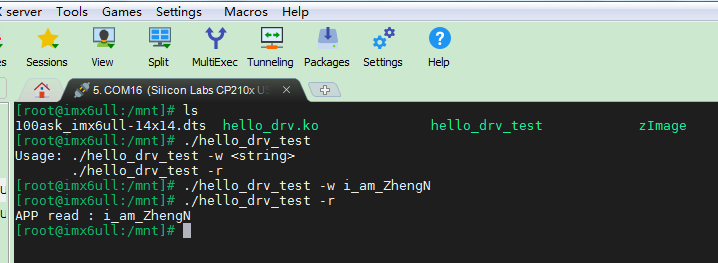
下面是完整的hello驅動程序(來源:百問網):
左右滑動查看全部代碼>>>
#include
#include
#include
#include
#include
#include
#include
#include
#include
#include
#include
#include
#include
#include
#include

/* 1. 確定主設備號                                                                 */
static int major = 0;
static char kernel_buf[1024];
static struct class *hello_class;


#define MIN(a, b) (a < b ? a : b)

/* 3. 實現對應的open/read/write等函數,填入file_operations結構體                   */
static ssize_t hello_drv_read (struct file *file, char __user *buf, size_t size, loff_t *offset)
{
  int err;
  printk("%s %s line %d\n", __FILE__, __FUNCTION__, __LINE__);
  err = copy_to_user(buf, kernel_buf, MIN(1024, size));
  return MIN(1024, size);
}

static ssize_t hello_drv_write (struct file *file, const char __user *buf, size_t size, loff_t *offset)
{
  int err;
  printk("%s %s line %d\n", __FILE__, __FUNCTION__, __LINE__);
  err = copy_from_user(kernel_buf, buf, MIN(1024, size));
  return MIN(1024, size);
}

static int hello_drv_open (struct inode *node, struct file *file)
{
  printk("%s %s line %d\n", __FILE__, __FUNCTION__, __LINE__);
  return 0;
}

static int hello_drv_close (struct inode *node, struct file *file)
{
  printk("%s %s line %d\n", __FILE__, __FUNCTION__, __LINE__);
  return 0;
}

/* 2. 定義自己的file_operations結構體                                              */
static struct file_operations hello_drv =
{
  .owner	 = THIS_MODULE,
  .open    = hello_drv_open,
  .read    = hello_drv_read,
  .write   = hello_drv_write,
  .release = hello_drv_close,
};

/* 4. 把file_operations結構體告訴內核:注冊驅動程序                                */
/* 5. 誰來注冊驅動程序啊?得有一個入口函數:安裝驅動程序時,就會去調用這個入口函數 */
static int __init hello_init(void)
{
  int err;

  printk("%s %s line %d\n", __FILE__, __FUNCTION__, __LINE__);
  major = register_chrdev(0, "hello", &hello_drv);  /* /dev/hello */


  hello_class = class_create(THIS_MODULE, "hello_class");
  err = PTR_ERR(hello_class);
  if (IS_ERR(hello_class)) {
    printk("%s %s line %d\n", __FILE__, __FUNCTION__, __LINE__);
    unregister_chrdev(major, "hello");
    return -1;
  }

  device_create(hello_class, NULL, MKDEV(major, 0), NULL, "hello"); /* /dev/hello */

  return 0;
}

/* 6. 有入口函數就應該有出口函數:卸載驅動程序時,就會去調用這個出口函數           */
static void __exit hello_exit(void)
{
  printk("%s %s line %d\n", __FILE__, __FUNCTION__, __LINE__);
  device_destroy(hello_class, MKDEV(major, 0));
  class_destroy(hello_class);
  unregister_chrdev(major, "hello");
}


/* 7. 其他完善:提供設備信息,自動創建設備節點                                     */

module_init(hello_init);
module_exit(hello_exit);

MODULE_LICENSE("GPL");
END
來源:嵌入式大雜燴
版權歸原作者所有,如有侵權,請聯系刪除。
▍推薦閱讀
用“兩個浮點數相等”被說了一頓
麒麟9000s,并非來自SMIC,而是...
程序員最容易讀錯的單詞,聽到status我炸了


