Binder 是 Android 系統中用于跨進程通信的一種機制,它允許一個進程中的組件與另一個進程中的組件進行通信,從而實現進程間通信 (IPC)。Binder 機制是基于 Linux 內核提供的進程間通信機制 (IPC) 實現的。
在 Binder 機制中,每個進程都有一個 Binder 驅動程序,它負責管理該進程中的所有 Binder 對象。每個 Binder 對象都有一個唯一的標識符,稱為 Binder 標識符 (Binder identity),它可以用于在進程之間傳遞 Binder 引用。Binder 機制允許在客戶端進程和服務進程之間建立一個通信通道 (communication channel),客戶端可以通過這個通道向服務端發送請求,服務端可以處理請求并返回結果。
Binder 機制中的主要組件包括以下幾個部分:
Binder 驅動程序:負責管理 Binder 對象,以及為客戶端進程和服務進程之間建立通信通道。
Binder 對象:具有唯一標識符的對象,用于在進程之間傳遞引用。
Binder 接口:定義了客戶端可以調用的方法,以及服務端可以實現的方法。
Binder 代理 (Proxy):客戶端進程中的對象,用于與服務端進程通信,并代表客戶端調用服務端的方法。
Binder Stub:服務端進程中的對象,用于實現 Binder 接口,并處理客戶端發送的請求。
使用 Binder 機制可以實現跨進程通信,例如在 Android 應用程序中,可以使用 AIDL (Android Interface Definition Language) 定義接口和方法,并使用 Binder 機制在客戶端進程和服務端進程之間進行通信。這樣可以使應用程序更加靈活和高效,例如可以將耗時的操作放在服務端處理,減少客戶端的負擔,提高應用程序的性能和響應速度。
AIDL(Android Interface Definition Language)是一種 IDL 語言,用于生成可以在 Android 設備上兩個進程之間進行進程間通信(IPC)的代碼。 通過 AIDL,可以在一個進程中獲取另一個進程的數據和調用其暴露出來的方法,從而滿足進程間通信的需求。通常,暴露方法給其他應用進行調用的應用稱為服務端,調用其他應用的方法的應用稱為客戶端,客戶端通過綁定服務端的 Service 來進行交互。
只有當你允許來自不同的客戶端訪問你的服務并且需要處理多線程問題時你才必須使用AIDL”,其他情況下你都可以選擇其他方法,如使用 Messenger,也能跨進程通信。可見 AIDL 是處理多線程、多客戶端并發訪問的,而 Messenger 是單線程處理。
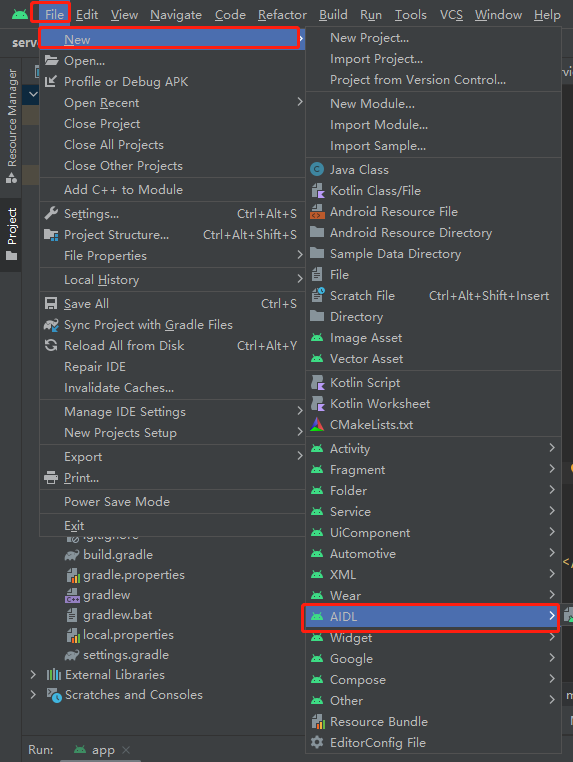
我們在android studio中創建aidl的方法如下:
默認情況下,AIDL 支持下列數據類型:
八種基本數據類型:byte、char、short、int、long、float、double、boolean
String、CharSequence
List類型。List承載的數據必須是AIDL支持的類型,或者是其它聲明的AIDL對象
Map類型。Map承載的數據必須是AIDL支持的類型,或者是其它聲明的AIDL對象
定義三個java class,分別為MyService.java,MyBinder.Java,MainActivity.java
MyService.java的定義如下:
package com.example.binder;

import android.app.Service;
import android.content.Intent;
import android.os.Binder;
import android.os.IBinder;
import android.util.Log;

public class MyService extends Service {
    public MyService() {
    }

    @Override
    public IBinder onBind(Intent intent) {
        MyBinder mBinder = new MyBinder();
        return mBinder;
    }
}
package com.example.binder;
import android.os.Binder;
import android.util.Log;
public class MyBinder extends Binder {
final String TAG = "zhongjun_MyBinder";
public void sayHello() {
Log.d(TAG, "Hello from service!");
}
}package com.example.binder;
import androidx.appcompat.app.AppCompatActivity;
import android.content.ComponentName;
import android.content.Context;
import android.content.Intent;
import android.content.ServiceConnection;
import android.os.Bundle;
import android.os.IBinder;
import android.util.Log;
import android.view.View;
import android.widget.Button;
public class MainActivity extends AppCompatActivity {
final String TAG = "zhongjun_MainActivity";
private MyBinder binder;
private boolean bound = false;
Button myButton;
private ServiceConnection connection = new ServiceConnection() {
@Override
public void onServiceConnected(ComponentName componentName, IBinder iBinder) {
Log.d(TAG, "onServiceConnected");
bound = true;
binder = (MyBinder) iBinder;
binder.sayHello();
}
@Override
public void onServiceDisconnected(ComponentName componentName) {
Log.d(TAG, "onServiceDisconnected");
bound = false;
}
};
@Override
protected void onCreate(Bundle savedInstanceState) {
super.onCreate(savedInstanceState);
setContentView(R.layout.activity_main);
Intent intent = new Intent(this, MyService.class);
myButton = findViewById(R.id.my_button);
myButton.setOnClickListener(new View.OnClickListener() {
@Override
public void onClick(View v) {
// 處理按鈕點擊事件
Log.d(TAG, "click button ");
bindService(intent, connection, Context.BIND_AUTO_CREATE);
}
});
}
}ServiceConnection 是 Android 應用程序中用于連接和管理服務的接口。它允許客戶端應用程序與服務進行通信并獲取服務提供的數據或執行服務提供的操作。
ServiceConnection 接口中定義了兩個方法:onServiceConnected() 和 onServiceDisconnected()。onServiceConnected() 方法在客戶端應用程序成功綁定到服務時調用,該方法提供了一個 IBinder 對象,該對象可以用于與服務進行通信。onServiceDisconnected() 方法在客戶端應用程序與服務斷開連接時調用。
使用 ServiceConnection,客戶端應用程序可以綁定到一個服務并發送請求,服務可以在收到請求后執行相應的操作并返回結果。客戶端應用程序還可以使用 ServiceConnection 監聽服務的連接狀態,并在服務連接斷開時采取相應的措施,例如重新綁定服務或提示用戶。
總之,ServiceConnection 是 Android 應用程序中用于連接和管理服務的重要接口,它允許客戶端應用程序與服務進行通信并控制服務的連接狀態。在開發 Android 應用程序時,開發人員通常需要實現 ServiceConnection 接口來管理應用程序與服務之間的通信和連接。
Intent intent = new Intent(this, MyService.class);
這行代碼是創建一個 Intent 對象,用于啟動或綁定 MyService 類中定義的服務。
第一個參數 this 是當前上下文對象,用于標識 Intent 的來源。在這個例子中,this 可能是一個 Activity 或者一個 Service。
第二個參數 MyService.class 是服務的類名。它告訴系統要啟動或綁定哪個服務。
創建 Intent 對象后,可以使用 startService() 方法啟動服務,或使用 bindService() 方法綁定服務。如果希望服務在后臺持續運行并執行某些操作,通常會使用 startService() 方法啟動服務。如果希望與服務進行交互并執行某些操作,通常會使用 bindService() 方法綁定服務。
例如,如果要啟動 MyService,可以使用以下代碼:
Intent intent = new Intent(this, MyService.class);
startService(intent);
如果要綁定到 MyService,并獲取服務提供的數據或執行服務提供的操作,可以使用以下代碼:
Intent intent = new Intent(this, MyService.class);
bindService(intent, mServiceConnection, Context.BIND_AUTO_CREATE);
其中,mServiceConnection 是一個 ServiceConnection 對象,用于管理服務的連接狀態。BIND_AUTO_CREATE 參數表示如果服務不存在,則會自動創建一個。
AndroidManifest.xml為
<?xml version="1.0" encoding="utf-8"?>
<manifest xmlns:android="http://schemas.android.com/apk/res/android"
  xmlns:tools="http://schemas.android.com/tools">

  <application
    android:allowBackup="true"
    android:dataExtractionRules="@xml/data_extraction_rules"
    android:fullBackupContent="@xml/backup_rules"
    android:icon="@mipmap/ic_launcher"
    android:label="@string/app_name"
    android:supportsRtl="true"
    android:theme="@style/Theme.Binder"
    tools:targetApi="31">
    <service
      android:name=".MyService"
      android:enabled="true"
      android:exported="true" />

    <activity
      android:name=".MainActivity"
      android:exported="true">
      <intent-filter>
        <action android:name="android.intent.action.MAIN" />

        <category android:name="android.intent.category.LAUNCHER" />
      </intent-filter>
    </activity>
  </application>

</manifest>一共有兩個類MainActivity.java,Myservice.java跟一個aidl文件MyAidlInterface.aidl
MainActivity.java
package com.example.aidl_signal;

import androidx.appcompat.app.AppCompatActivity;

import android.content.ComponentName;
import android.content.Context;
import android.content.Intent;
import android.content.ServiceConnection;
import android.os.Bundle;
import android.os.IBinder;
import android.os.RemoteException;
import android.util.Log;
import android.view.View;
import android.widget.Button;

public class MainActivity extends AppCompatActivity {

    final String TAG = "zhongjun_MainActivity";

    Button myButton;

    private ServiceConnection mServiceConnection = new ServiceConnection() {
        @Override
        public void onServiceConnected(ComponentName componentName, IBinder iBinder) {
            MyAidlInterface mMyAidlInterface = MyAidlInterface.Stub.asInterface(iBinder);

            try{
                int result = mMyAidlInterface.add(1, 2);
                Log.d(TAG, "mMyAidlInterface.add:"   result);
            }catch (RemoteException e) {
                Log.e(TAG, "RemoteException: "   e.getMessage());
            }

        }

        @Override
        public void onServiceDisconnected(ComponentName componentName) {

        }
    };

    @Override
    protected void onCreate(Bundle savedInstanceState) {
        super.onCreate(savedInstanceState);
        setContentView(R.layout.activity_main);

        Intent intent = new Intent(this, MyService.class);
        myButton = findViewById(R.id.my_button);
        myButton.setOnClickListener(new View.OnClickListener() {
            @Override
            public void onClick(View v) {
                // 處理按鈕點擊事件
                Log.d(TAG, "click button ");
                bindService(intent, mServiceConnection, Context.BIND_AUTO_CREATE);
            }
        });
    }
}
Myservice.java
package com.example.aidl_signal;

import android.app.Service;
import android.content.Intent;
import android.os.IBinder;

public class MyService extends Service {

    @Override
    public IBinder onBind(Intent intent) {
        return new MyServiceImpl();
    }

    private class MyServiceImpl extends MyAidlInterface.Stub{
        // 這是一個示例方法
        public int add(int a, int b) {
            return a   b;
        }
    }
}
MyAidlInterface.aidl
// MyAidlInterface.aidl
package com.example.aidl_signal;

// Declare any non-default types here with import statements

interface MyAidlInterface {
    int add(int a, int b);
}
AndroidManifest.xml
<?xml version="1.0" encoding="utf-8"?>
<manifest xmlns:android="http://schemas.android.com/apk/res/android"
    xmlns:tools="http://schemas.android.com/tools">

    <application
        android:allowBackup="true"
        android:dataExtractionRules="@xml/data_extraction_rules"
        android:fullBackupContent="@xml/backup_rules"
        android:icon="@mipmap/ic_launcher"
        android:label="@string/app_name"
        android:supportsRtl="true"
        android:theme="@style/Theme.Aidl_signal"
        tools:targetApi="31">
        <service
            android:name=".MyService"
            android:enabled="true"
            android:exported="true"></service>

        <activity
            android:name=".MainActivity"
            android:exported="true">
            <intent-filter>
                <action android:name="android.intent.action.MAIN" />

                <category android:name="android.intent.category.LAUNCHER" />
            </intent-filter>
        </activity>
    </application>

</manifest>
跟前面的本質區別就是幾行代碼
MyAidlInterface mMyAidlInterface = MyAidlInterface.Stub.asInterface(iBinder);
這行代碼是將 IBinder 對象轉換為 MyAidlInterface 接口的實例對象。
在 Android 應用程序中,跨進程通信 (IPC) 常常使用 AIDL (Android Interface Definition Language) 來定義接口和方法。當客戶端綁定到一個服務時,服務返回一個 IBinder 對象,客戶端可以使用它來調用服務中的方法。但是,IBinder 對象并不能直接調用服務中的方法,因為客戶端和服務在不同的進程中。因此,需要將 IBinder 對象轉換為接口實例對象,以便客戶端可以使用接口調用服務中的方法。
在這個例子中,MyAidlInterface 是一個 AIDL 接口,它定義了客戶端可以調用的方法。Stub 是 MyAidlInterface 的內部類,它實現了 MyAidlInterface 接口,并提供了 asInterface() 靜態方法,用于將 IBinder 對象轉換為接口實例對象。
當客戶端綁定到服務時,服務返回的 IBinder 對象可以在客戶端的 ServiceConnection 實現中獲取。然后,客戶端可以使用 Stub.asInterface() 方法將 IBinder 對象轉換為接口實例對象,以便客戶端可以使用接口調用服務中的方法
一共有一個MyService.java,一個MyInterface.aidl,一個AndroidManifest.xml文件
MyService.java
package com.example.server;

import android.app.Service;
import android.content.Intent;
import android.os.IBinder;
import android.os.RemoteException;

public class MyService extends Service {

    private IBinder mBinder = new MyBinder();
    public MyService() {
    }

    @Override
    public IBinder onBind(Intent intent) {
        return mBinder;
    }

    private class MyBinder extends MyInterface.Stub {
        @Override
        public int add(int a, int b) throws RemoteException {
            return a   b;
        }
    }
}
MyInterface.aidl
// MyInterface.aidl
package com.example.server;

// Declare any non-default types here with import statements

interface MyInterface {
    /**
     * Demonstrates some basic types that you can use as parameters
     * and return values in AIDL.
     */
    int add(int a, int b);
}
AndroidManifest.xml
<?xml version="1.0" encoding="utf-8"?>
<manifest xmlns:android="http://schemas.android.com/apk/res/android"
  xmlns:tools="http://schemas.android.com/tools">

  <application
    android:allowBackup="true"
    android:dataExtractionRules="@xml/data_extraction_rules"
    android:fullBackupContent="@xml/backup_rules"
    android:icon="@mipmap/ic_launcher"
    android:label="@string/app_name"
    android:supportsRtl="true"
    android:theme="@style/Theme.Server"
    tools:targetApi="31">
    <service
      android:name=".MyService"
      android:enabled="true"
      android:exported="true">
      <intent-filter>
        <!--添加了一個唯一的action,供客戶端隱式啟動service-->
        <action android:name="com.example.server.MyService"/>
      </intent-filter></service>
  </application>

</manifest>
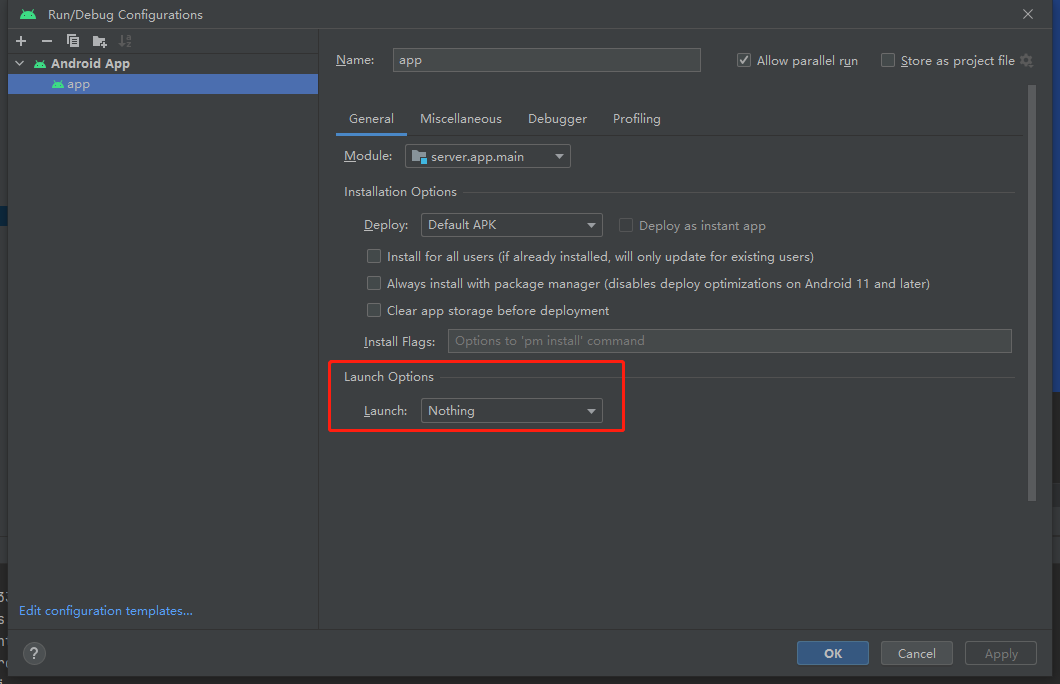
需要注意的是server沒有activity,只有service,所以我們在配置工程的時候配置沒有activity啟動
客戶端只有MainActivity
package com.example.client;

import androidx.appcompat.app.AppCompatActivity;

import android.content.ComponentName;
import android.content.Context;
import android.content.Intent;
import android.content.ServiceConnection;
import android.os.Bundle;
import android.os.IBinder;
import android.os.RemoteException;
import android.util.Log;

import com.example.server.MyInterface;


public class MainActivity extends AppCompatActivity {
    final String TAG = "zhongjun_MainActivity";
    private MyInterface mMyService;

    private ServiceConnection mConnection = new ServiceConnection() {
        @Override
        public void onServiceConnected(ComponentName className, IBinder service) {
            Log.d(TAG, "onServiceConnected");
            mMyService = MyInterface.Stub.asInterface(service);

            try {
                int result = mMyService.add(1, 2);
                Log.d(TAG, "mMyService.add:"   result);
            } catch (RemoteException e) {
                e.printStackTrace();
            }
        }

        @Override
        public void onServiceDisconnected(ComponentName className) {
            Log.d(TAG, "onServiceDisconnected");
        }
    };

    @Override
    protected void onCreate(Bundle savedInstanceState) {
        super.onCreate(savedInstanceState);
        setContentView(R.layout.activity_main);

        Log.d(TAG, "onCreate");
        Intent intent = new Intent("com.example.server.MyService");

        intent.setPackage("com.example.server");
        bindService(intent, mConnection, Context.BIND_AUTO_CREATE);


    }
}
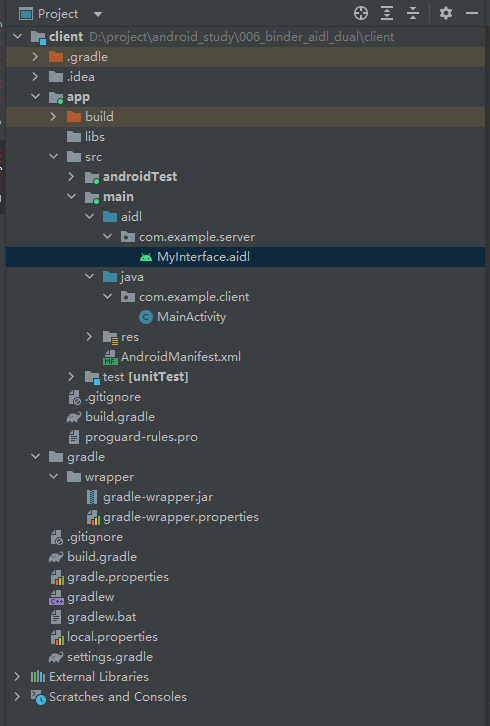
另外,還需要把server端的aidl copy過來
copy路徑為server\app\src\main整個aidl文件夾 放到client\app\src\main下面,工程顯示如下: