擊左上方藍(lán)色“一口Linux”,選擇“設(shè)為星標(biāo)”
第一時間看干貨文章 ?【干貨】嵌入式驅(qū)動工程師學(xué)習(xí)路線 ?【干貨】Linux嵌入式知識點(diǎn)-思維導(dǎo)圖-免費(fèi)獲取 ?【就業(yè)】一個可以寫到簡歷的基于Linux物聯(lián)網(wǎng)綜合項(xiàng)目 ?【就業(yè)】簡歷模版
在實(shí)際項(xiàng)目開發(fā)中,我們程序默認(rèn)終端的輸入輸出是串口,但是調(diào)試時可能只能通過網(wǎng)絡(luò)遠(yuǎn)程調(diào)試,而遠(yuǎn)程最常用的登錄手段就是telnet和ssh;
本文就探討如何通過telnet遠(yuǎn)程控制我們的主程序,退出telnet客戶端,再交還終端控制權(quán)。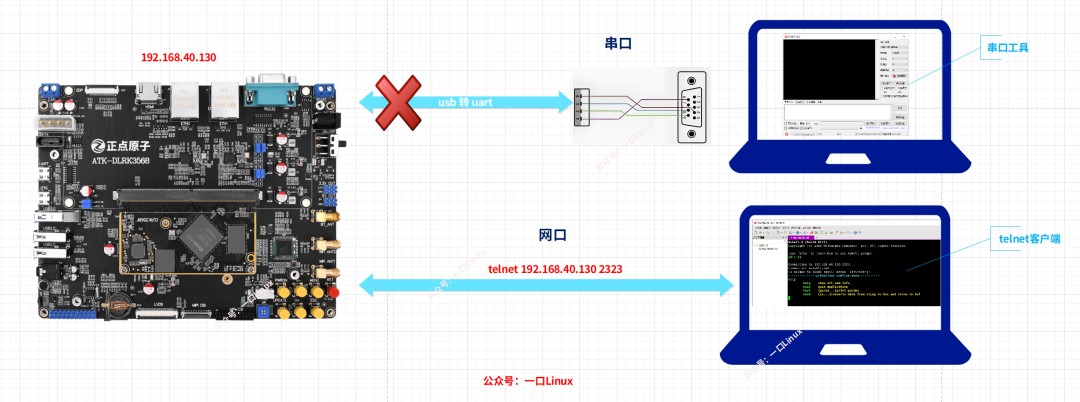
完整代碼獲取見文末。
該功能最核心的功能是利用函數(shù)dup()、dup2()。
來看下Linux手冊如何描述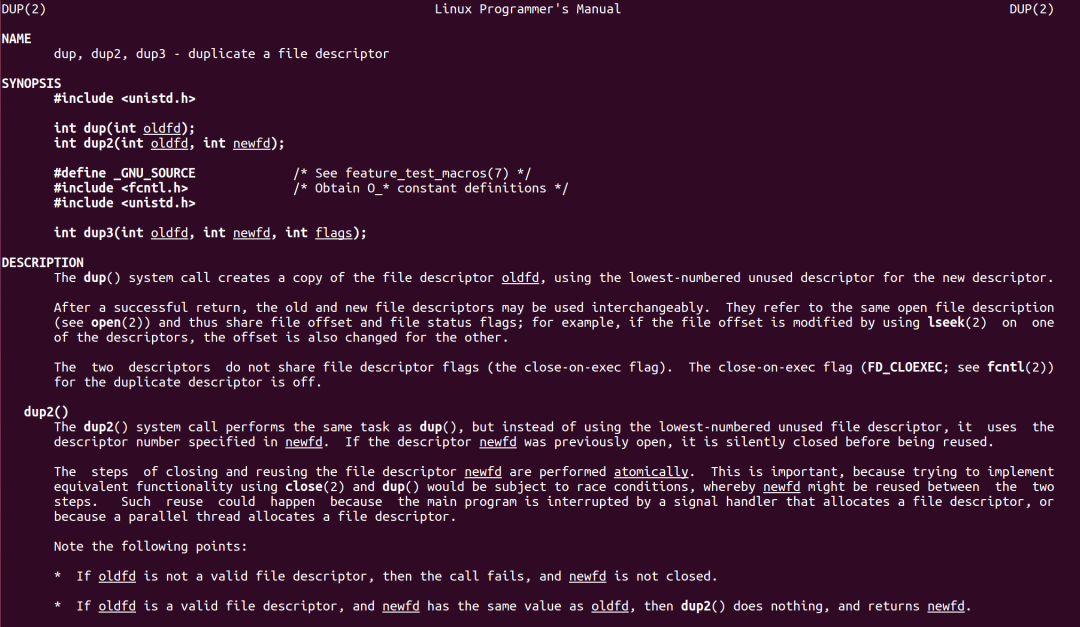
dup 和 dup2 是 Linux/Unix 系統(tǒng)級 I/O 函數(shù),核心作用:復(fù)制文件描述符,讓多個文件描述符指向同一個文件表項(xiàng)(共享文件偏移量、打開狀態(tài))。
它們是進(jìn)程間通信、重定向標(biāo)準(zhǔn)輸入輸出、守護(hù)進(jìn)程編程的核心函數(shù)。
函數(shù)原型如下:
int dup(int oldfd);
功能
oldfd,返回當(dāng)前進(jìn)程可用的最小文件描述符int dup2(int oldfd, int newfd);
功能
oldfd 到 newfdnewfd 已經(jīng)打開,先自動關(guān)閉它(原子操作,無競爭)newfd 和 oldfd 指向同一個文件之前寫過一篇關(guān)于實(shí)現(xiàn)一個簡單命令行的文章,本文在這個代碼基礎(chǔ)之上,實(shí)現(xiàn)通過telnet操作命令。 《c語言實(shí)例|實(shí)現(xiàn)簡單的命令行》 程序主要流程如下: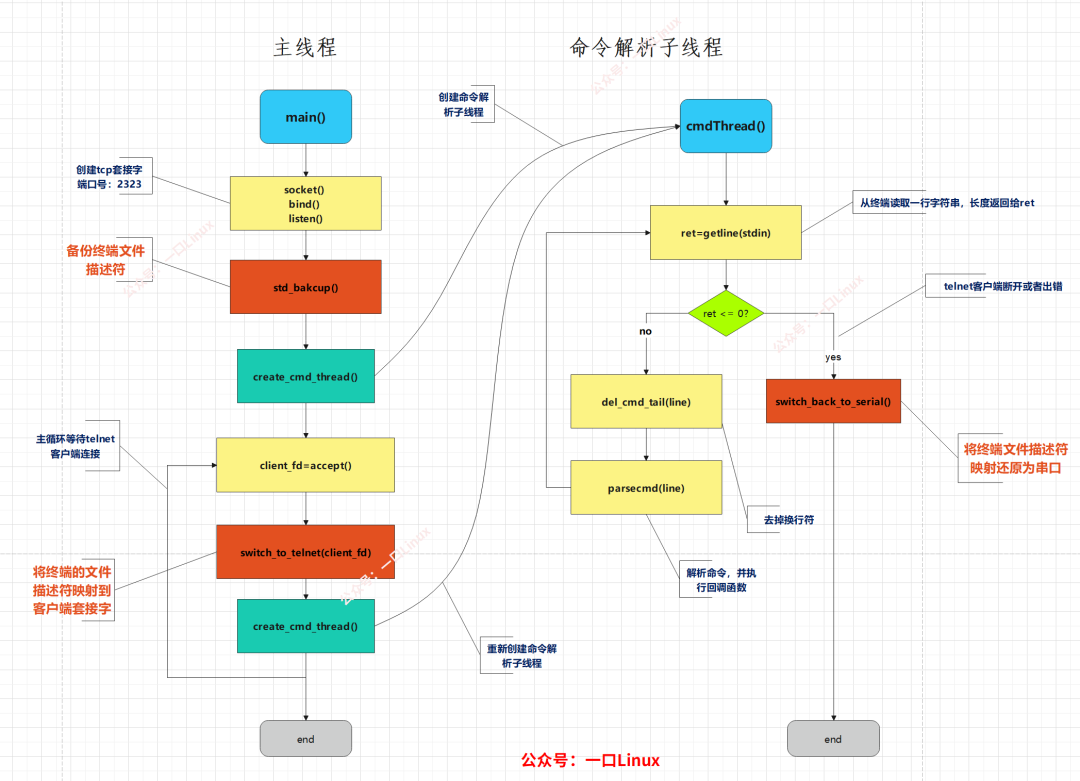 注意:
注意:
 dup2 只是修改文件描述符指向
 但已經(jīng)在等待的阻塞 I/O 不會自動遷移
 子線程還在等 舊的串口 stdin
 新 Telnet 輸入根本進(jìn)不去
 所以有新的連接必須重啟該線程
peng@ubuntu:~/work/demo/telnet/telcmd$ tree .
.
├── cmd.c
├── color.h
├── mkapp.sh
├── tel
└── telnet.c

0 directories, 5 files
int main()
{
    int server_fd, client_fd;
    struct sockaddr_in addr;
    int addr_len = sizeof(addr);
staticint telnet_cli_created = 0;

    server_fd = socket(AF_INET, SOCK_STREAM, 0);
    if (server_fd == -1)
 {
  perror("[telnet]socket");
exit(1);
 }

    //port 2323
    addr.sin_family = AF_INET;
    addr.sin_addr.s_addr = INADDR_ANY;
    addr.sin_port = htons(TELNET_DUP_SERVER_PORT);

    if (bind(server_fd, (struct sockaddr*)&addr, addr_len) == -1)
 {
        perror("[telnet]bind");
exit(1);
    }

    listen(server_fd, 1);

 std_bakcup();
 cprintf(YEL,"[telnet]wait Telnet connect\n");
 create_cmd_thread();

while(1){
     client_fd = accept(server_fd, (struct sockaddr*)&addr, (socklen_t*)&addr_len);
     if (client_fd == -1) {
   perror("[telnet]accept");
   exit(1);
  }
  switch_to_telnet(client_fd);
  create_cmd_thread();
 }

    close(client_fd);
    close(server_fd);
    return0;
}
void switch_to_telnet(int new_fd)
{
staticint old_fd = -1;
// 忽略 SIGPIPE
 signal(SIGPIPE, SIG_IGN);
 cprintf(GREEN_H,"tel_dup(),%d %d\n",new_fd,old_fd);

if(new_fd != old_fd){
if(old_fd>0){
   if(telnet_fd  != -1){
    close(telnet_fd );
    telnet_fd  = -1;
   }
  }
  dup2(new_fd, STDOUT_FILENO);  // printf -> client
  dup2(new_fd, STDERR_FILENO);  // perror -> client
  dup2(new_fd, STDIN_FILENO);  // getchar <- client
  old_fd = new_fd;
  telnet_fd  = new_fd ;
 }else{
  cprintf(RED,"[telnet] fd is same\n");
 }
 fflush(stdout);
}
void switch_back_to_serial(void)
{
 dup2(original_stdout_fd, STDOUT_FILENO);
 dup2(original_stdout_fd, STDERR_FILENO);
 dup2(original_stdin_fd, STDIN_FILENO);
 if(telnet_fd  != -1){
  close(telnet_fd );
  telnet_fd  = -1;
 }
}
void std_bakcup(void)
{
 //保存原始標(biāo)準(zhǔn)輸出(串口)
 original_stdout_fd = dup(STDOUT_FILENO);
    original_stderr_fd = dup(STDERR_FILENO);
 original_stdin_fd = dup(STDIN_FILENO);
}
void create_cmd_thread(void)
{
int ret;
 pthread_attr_t attr;
staticint telnet_cli_created = 0;
static pthread_t th_cmd;

if(telnet_cli_created == 1)
 {
  pthread_cancel(th_cmd);
  telnet_cli_created = 0;
 }
if(telnet_cli_created == 0){
  ret = pthread_attr_init(&attr);
if (ret != 0)
  {
   printf("pthread_attr_init\n");
  }
  pthread_create(&th_cmd,&attr,cmdThread,NULL);

  telnet_cli_created = 1;
 }
}
ubuntu需要支持telnet服務(wù)器,
sudo apt install xinetd telnetd -y
service telnet
{
   disable = no
   flags  = REUSE
   socket_type = stream
   wait = no
   user = root
   server = /usr/sbin/in.telnetd
   log_on_failure += USERID
}
sudo systemctl restart xinetd
sudo systemctl enable xinetd  #開機(jī)運(yùn)行
telnet 127.0.0.1 2323
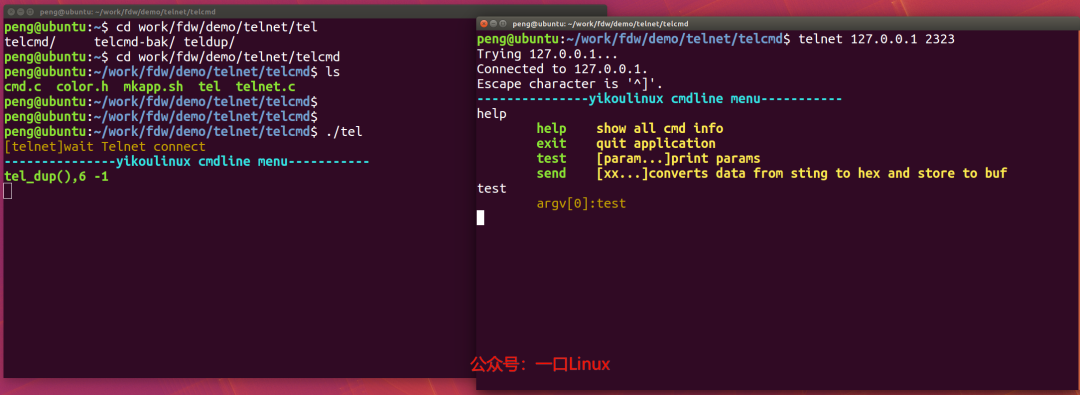 可以看到telnet連接后,可以輸入命令,并且返回命令結(jié)果。
測試步驟如下:
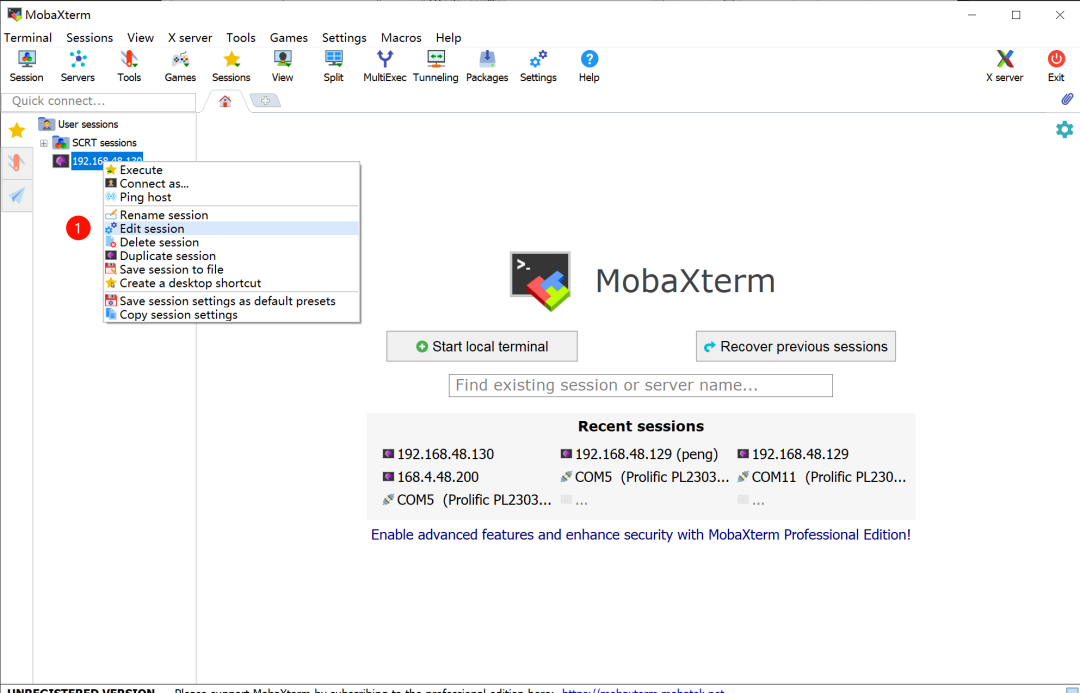
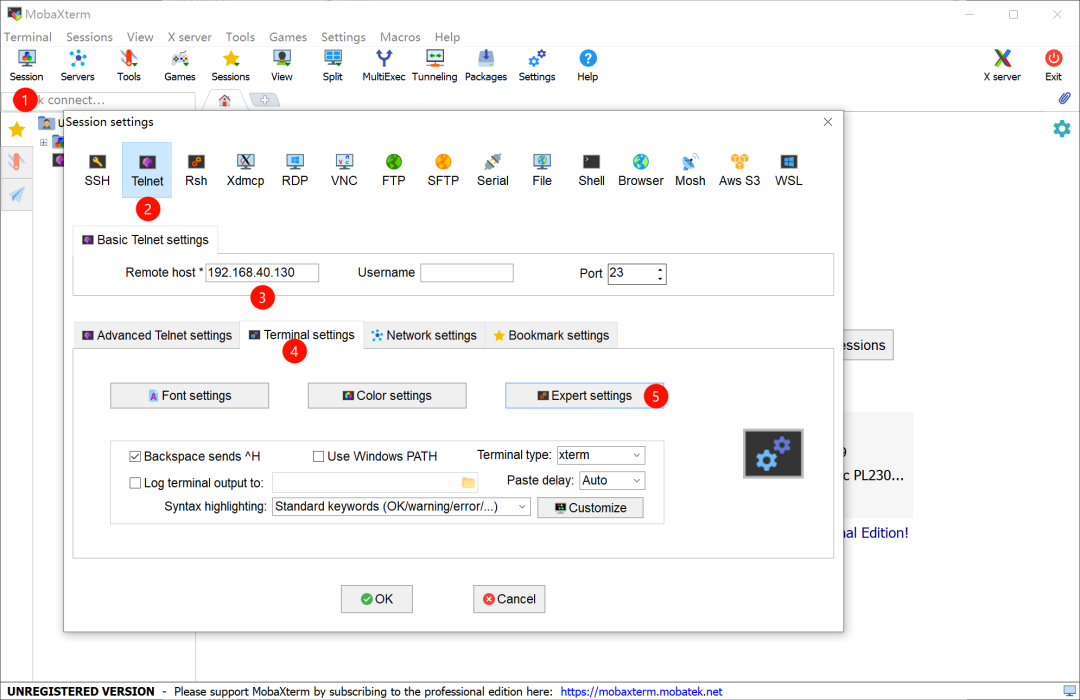
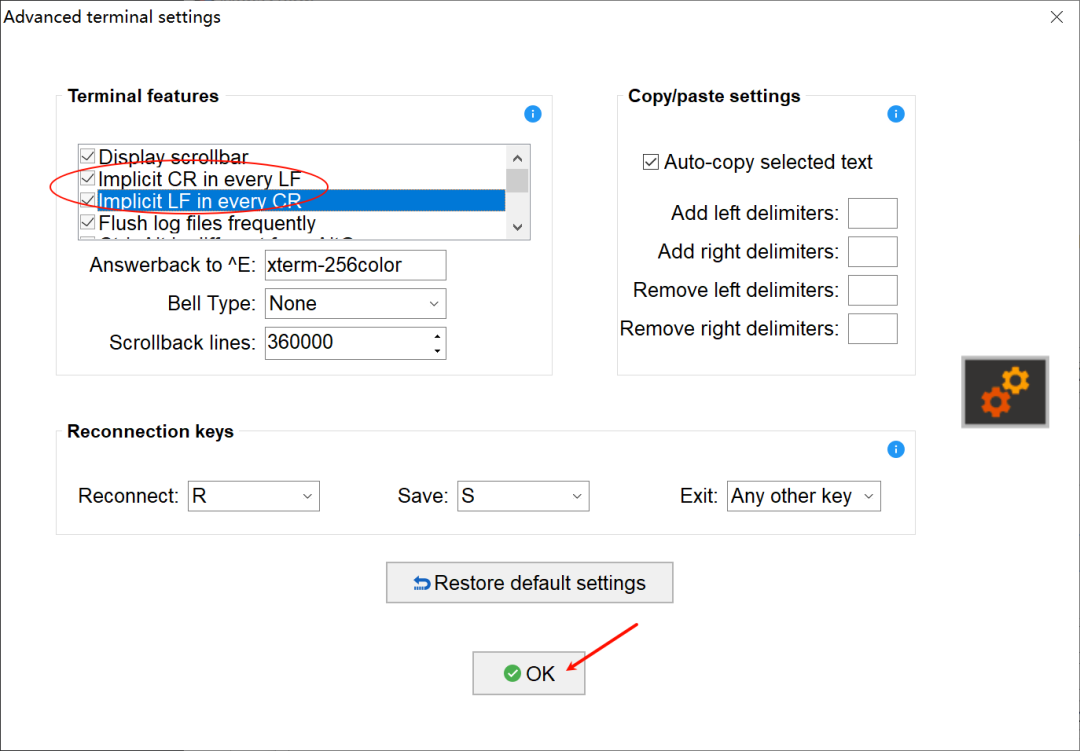
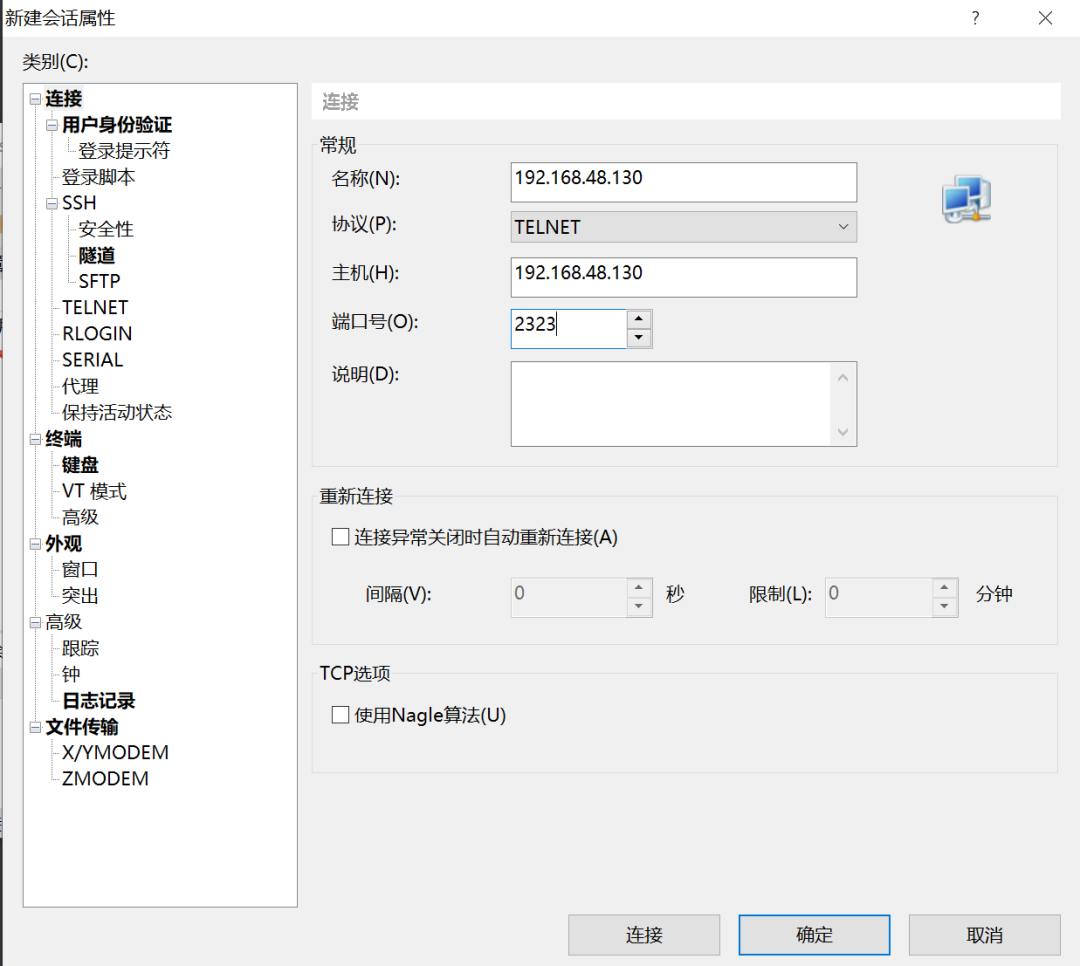
Linux換行符是**\n(對應(yīng)asc碼 0xa),windows的換行符是\r\n**(對應(yīng)asc碼 0xb 0xa),mobaXterm、xshell需要設(shè)置支持Linux換行符,否則打印格式會亂。
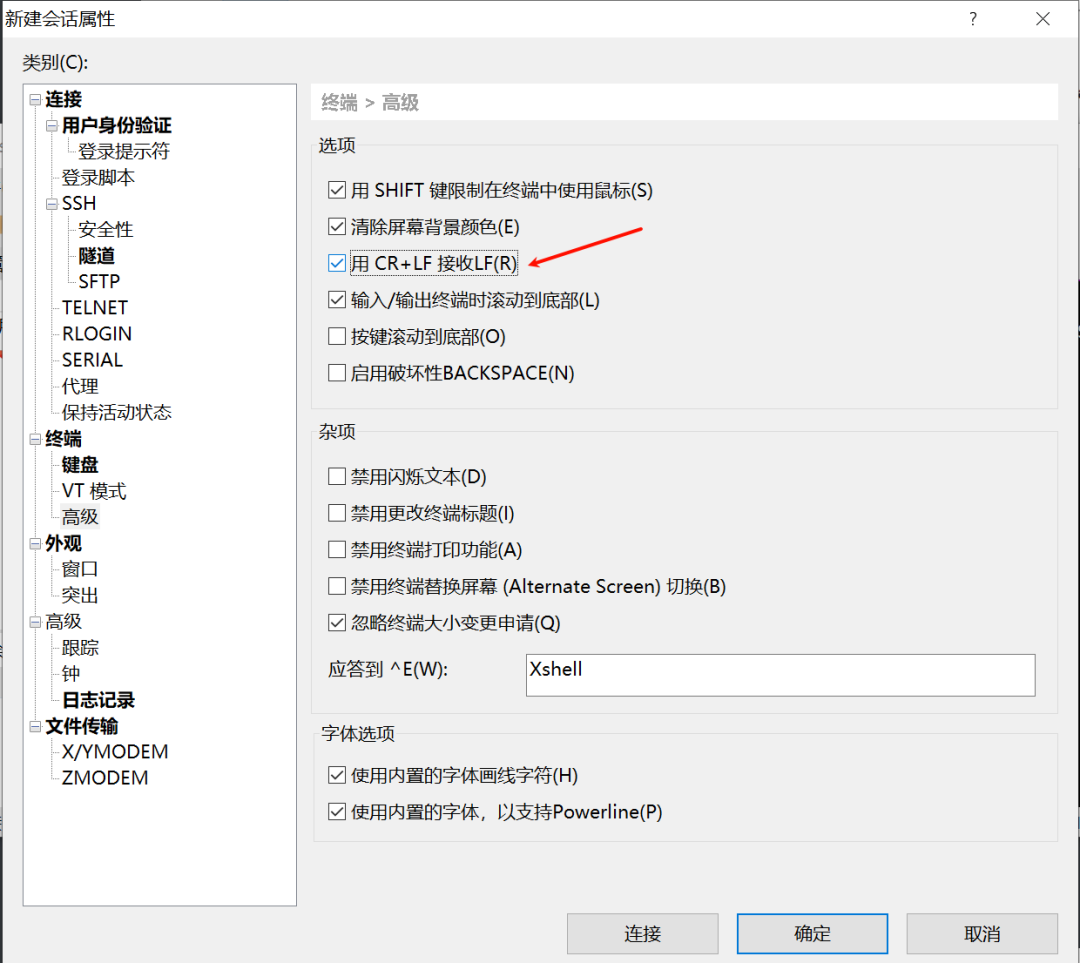
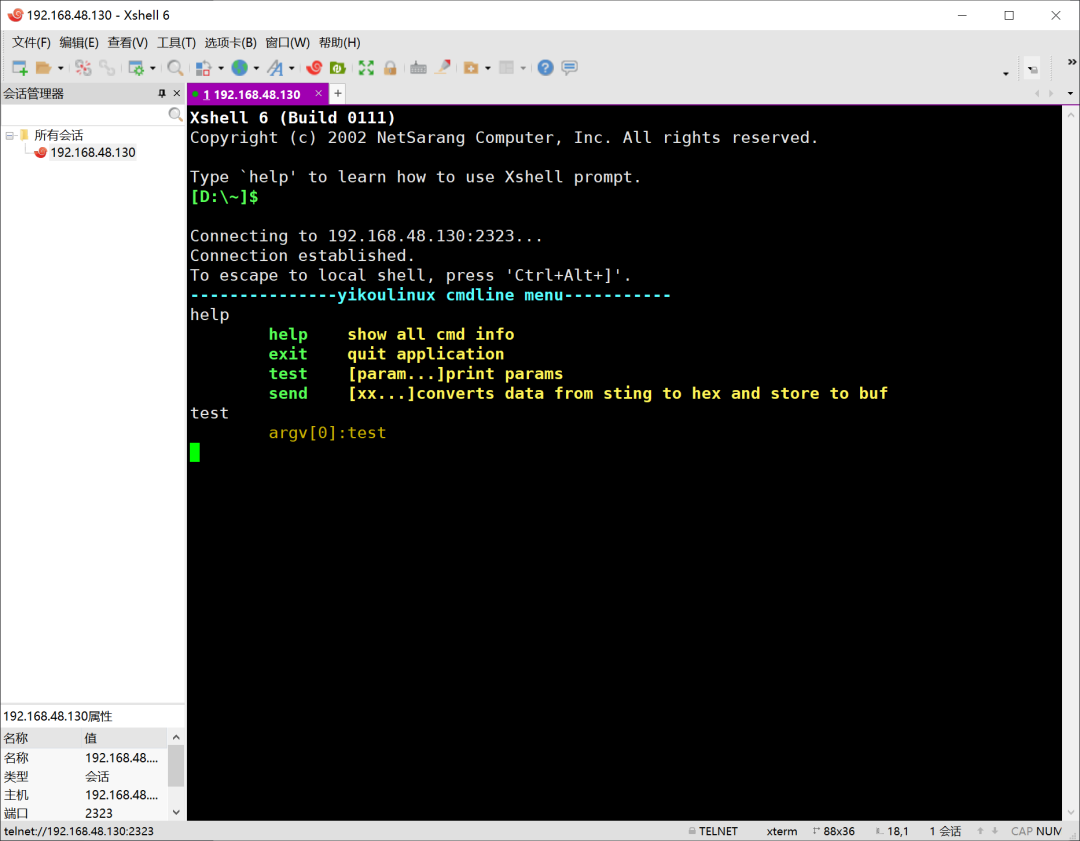
轉(zhuǎn)發(fā)留言:telnet
所有c語言基礎(chǔ)示例+應(yīng)用實(shí)例 合集獲取:
end
一口Linux
關(guān)注,回復(fù)【1024】海量Linux資料贈送
精彩文章合集
文章推薦