微信公眾號:OpenCV學(xué)堂
關(guān)注獲取更多計(jì)算機(jī)視覺與深度學(xué)習(xí)知識
模型
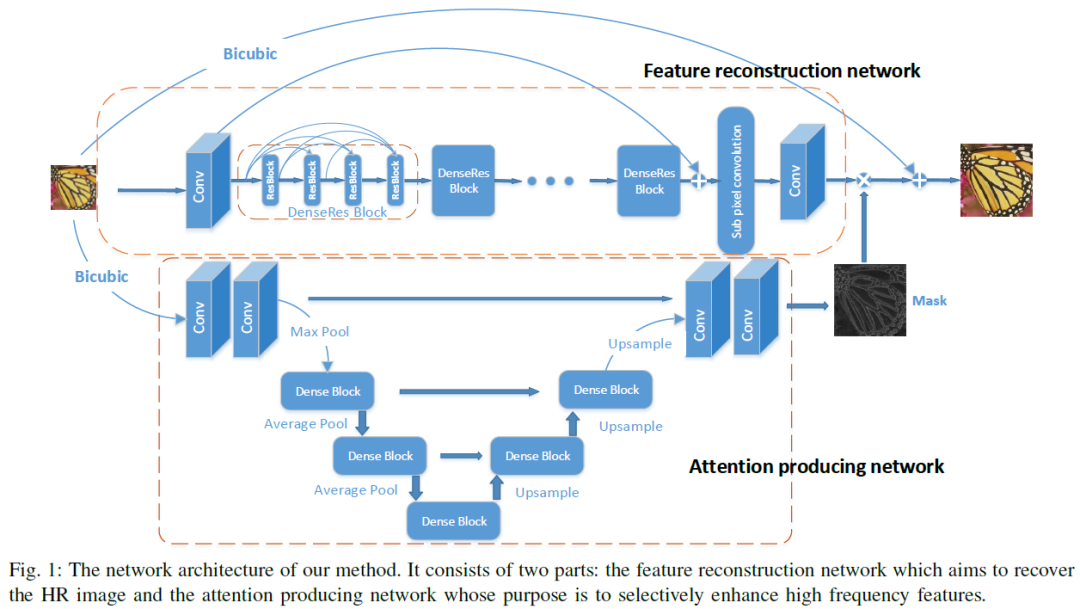
從模型上看到,它的輸入要求有兩個,分別是原圖跟它的雙立方插值圖像,輸出的則是超分辨率圖像。
模型下載與推理
omz_downloader --name single-image-super-resolution-1032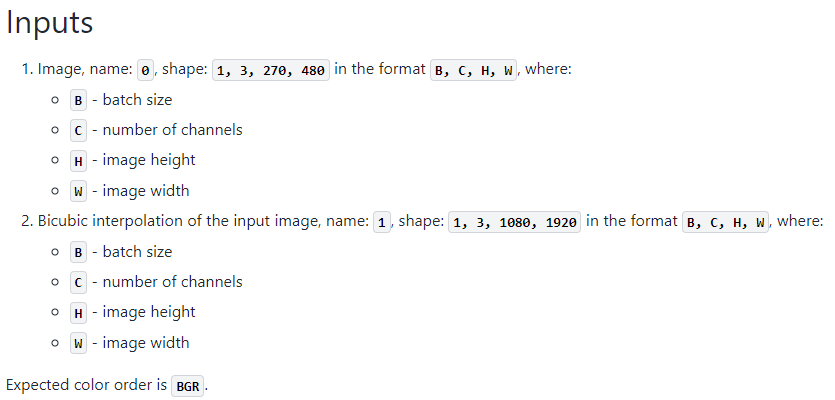
輸出層信息如下:

注意輸出層得到的結(jié)果是0~1之間的浮點(diǎn)數(shù),必須先乘以255,然后再轉(zhuǎn)換到0~255之間UINT8類型顯示。
代碼實(shí)現(xiàn)與演示
import cv2 as cvimport numpy as npimport openvino as ov# Load the model on to the devicecore = ov.Core()# Read the model.xml and weights filemodel = core.read_model(model="D:/projects/single-image-super-resolution-1032.xml")compiled_model = core.compile_model(model=model, device_name="CPU")# Store the input and output nodesoriginal_image_key, bicubic_image_key = compiled_model.inputsoutput_layer = compiled_model.output(0)bgr = cv.imread("D:/facedb/tiaoma/qr_blur_02.jpg")origin_bgr = cv.resize(src=bgr, dsize=(480, 270), interpolation=cv.INTER_CUBIC)bicubic_bgr = cv.resize(src=bgr, dsize=(1920, 1080), interpolation=cv.INTER_CUBIC)input_image = np.expand_dims(origin_bgr.transpose(2, 0, 1), axis=0)input_image_bicubic = np.expand_dims(bicubic_bgr.transpose(2, 0, 1), axis=0)result = compiled_model({original_image_key.any_name: input_image,bicubic_image_key.any_name: input_image_bicubic})[output_layer]result = result.squeeze(0).transpose(1, 2, 0)result *= 255result[result < 0] = 0result[result > 255] = 255result = result.astype(np.uint8)cv.imshow("super resolution", result)cv.imwrite("D:/result.jpg", result)cv.waitKey(0)cv.destroyAllWindows()
原圖

超分辨率圖像

六大案例
推薦閱讀
OpenCV4.8+YOLOv8對象檢測C++推理演示
ZXING+OpenCV打造開源條碼檢測應(yīng)用
攻略 | 學(xué)習(xí)深度學(xué)習(xí)只需要三個月的好方法
三行代碼實(shí)現(xiàn) TensorRT8.6 C++ 深度學(xué)習(xí)模型部署
實(shí)戰(zhàn) | YOLOv8+OpenCV 實(shí)現(xiàn)DM碼定位檢測與解析
對象檢測邊界框損失 – 從IOU到ProbIOU
初學(xué)者必看 | 學(xué)習(xí)深度學(xué)習(xí)的五個誤區(qū)
OpenCV4系統(tǒng)化學(xué)習(xí)