

本項目BOM很簡單,只有PIR傳感器、蜂鳴器、LED和按鈕開關(guān)幾個元件。按照電路圖組裝后可以使用了,報警后按下按鈕就關(guān)閉蜂鳴聲。
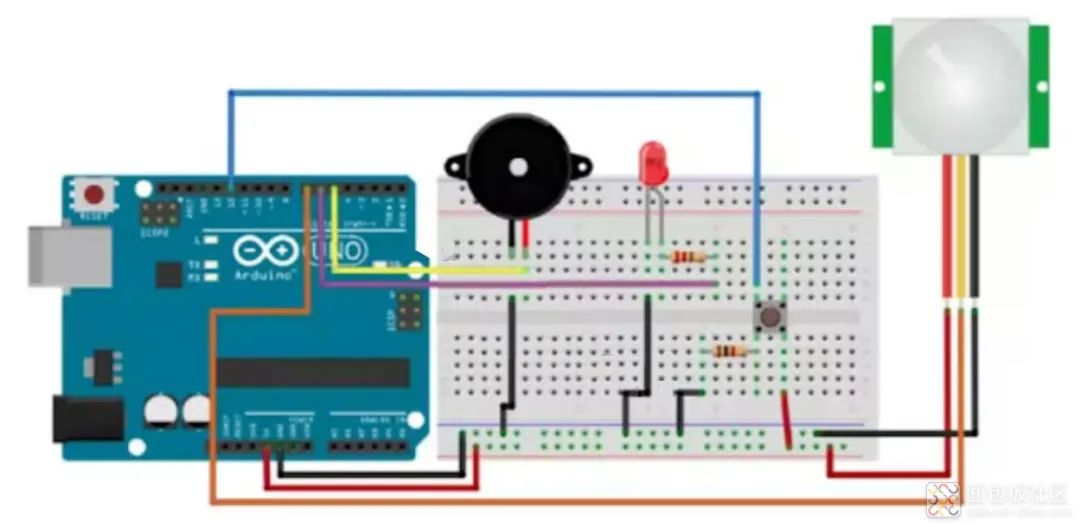
首先,將Arduino UNO開發(fā)板的 +5V、GND連接到面包板。
LED的陰極接地,陽極(長引腳)通過330 or 220歐姆的上拉電阻器連接到Arduino開發(fā)板的6#引腳。
蜂鳴器的正極連接到Arduino板子的5#引腳,負極引腳接GND。
按鈕開關(guān)的一個引腳通過1k歐姆電阻器接GND,另一引腳連接到Arduino的12引腳。
PIR運動傳感器的+Vcc、GND、output三個引腳分別連接于Arduino開發(fā)板的+Vcc、GND、pin 7引腳。
按照上述步驟連接正確后,接下來取Arduino IDE上傳代碼到。再檢查Serial Monitor的讀數(shù),移動手掌到傳感器前面,LED將閃亮,蜂鳴器將會報警。
CODE;C/C++
// Declaring Pins
const int buzzerPin = 5;
const int ledPin = 6;
const int motionPin = 7;
const int buttonPin = 12;
// Setting Buzzer mode to False
boolean buzzer_mode = false;
// For LED
int ledState = LOW;
long previousMillis = 0;
long interval = 100; ?// Interval at which LED blinks
void setup()
{
//The Following are our output
pinMode(ledPin,OUTPUT);
pinMode(buzzerPin,OUTPUT);
//Button is our Input
pinMode(buttonPin, INPUT);
// Wait before starting the alarm
delay(5000);
}
void loop()
{
// To chech whether the motion is detected or not
if (digitalRead(motionPin)) {
buzzer_mode = true;
}
// If alarm mode is on,blink our LED
if (buzzer_mode){
unsigned long currentMillis = millis();
if(currentMillis - previousMillis > interval) {
previousMillis = currentMillis;
if (ledState == LOW)
ledState = HIGH;
else
ledState = LOW;
// Switch the LED
digitalWrite(ledPin, ledState);
}
tone(buzzerPin,1000);
}
// If alarm is off
if (buzzer_mode == false) {
// No tone & LED off
noTone(buzzerPin);
digitalWrite(ledPin, LOW);
}
// If our button is pressed Switch off ringing and Setup
int button_state = digitalRead(buttonPin);
if (button_state) {buzzer_mode = false;}
}
如果你覺得這個小制作有用處,就把它裝進小盒子里,固定到窗臺、門框和陽臺的不顯眼位置,一個屬于自己的防盜警報器就誕生了。
作者:硬之城Allchips, 來源:面包板社區(qū)
鏈接:https://mbb.eet-china.com/blog/uid-me-3975615.html
版權(quán)聲明:本文為博主原創(chuàng),未經(jīng)本人允許,禁止轉(zhuǎn)載!


